List Of Value

A List Of Value (LOV), is a collection of data organized in attribute-value fashion. For example, the LOV in LOV example retrieves id, name and food family for a product.

Listing 1 LOV example
1 {195, High Top Almonds, Food};
2 {522, Tell Tale Walnuts, Food};
3 {844, Very Good Soda, Drink};

There may be multiple attributes in a LOV, but only one of them is the core value that is actually used in the analytical driver. Other values have a descriptive function: they can be used to provide a human readable description of the LOV, as well as to store information used, for example, to correlate analytical drivers. In our example, the core value is the customer’s id, while the others are additional data describing the customer. Knowage allows to create different types of LOV:

  • Query: SQL query to retrieve values from the database;

  • Script: Groovy or JavaScript to dynamically return values;

  • List of fixed values: Values are defined statically at LOV creation time;

  • Java objects: External object invoked by name that returns the list of values;

  • Dataset: Dataset already defined in Knowage Server that is used to retrieve values. Note that the dataset must not contain parameters, while profile attributes are allowed.
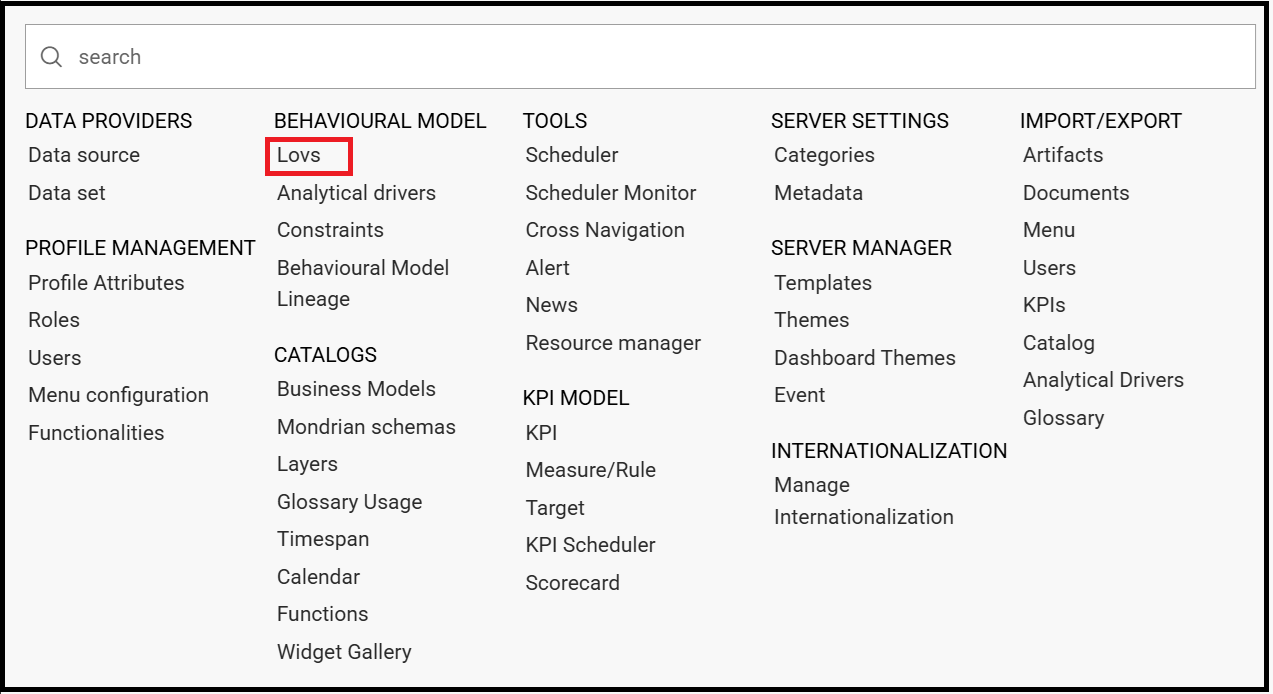
../../_images/image431.png

Fig. 12 LOV list.

To create and manage LOVs, select Behavioural Model > Lovs Management from the administration menu. The entire list of available LOVs appears, as shown in figure above. For each LOV, the list shows the label, description and type; to see the details of a LOV the user must simply select it and they will appear in the right half of the page. On the contrary, to delete one dataset click on the icon image37 available at the end of the row. Notice that you cannot delete a LOV if a driver is currently using it.
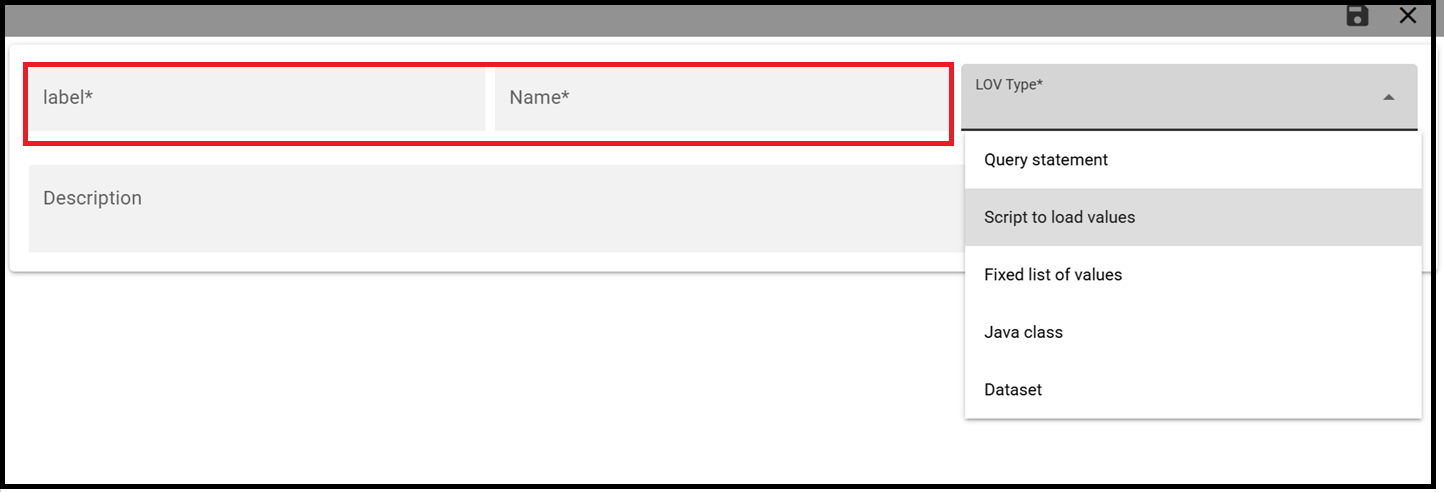
To create a new LOV, click on the icon image38 at the top right corner of the page. The LOV creation interface will open, where you can set label, name and description, choose the LOV type and define its values accordingly.

../../_images/image46.png

Fig. 13 LOV Creation interface.

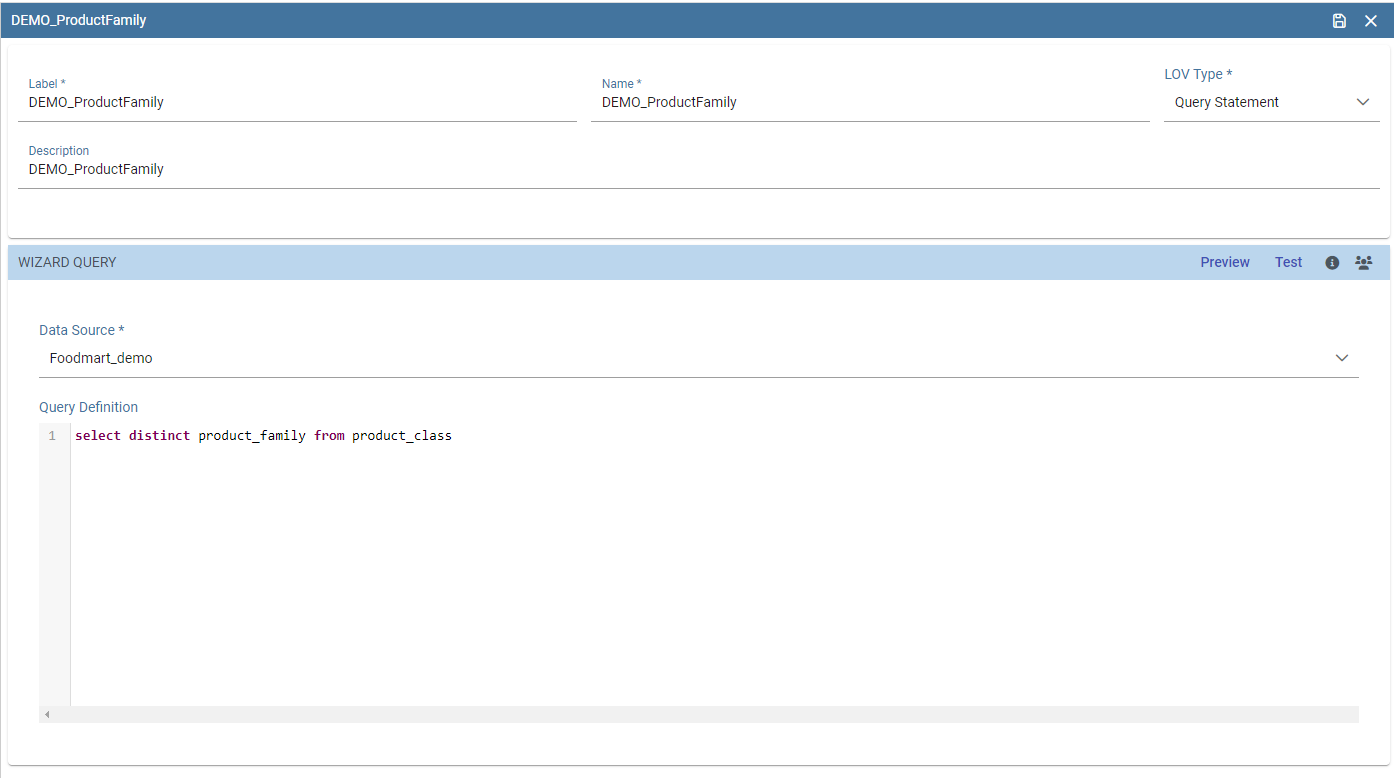
Once completed the form, click on Preview button to enable the Test button. Notice that you cannot save the LOV without testing it, since this allows to detect errors before the LOV is actually used in a driver and associated to a document. After testing, you will be able to define which column is the actual value of the LOV, i.e., which value will be passed to the analytical driver using this LOV. Only one column can be the value attribute and only one column can be chosen as Descriptive attribute, while the others can be visible. The two figures below exhibit an example. Columns that are not visible can be used for correlating drivers.
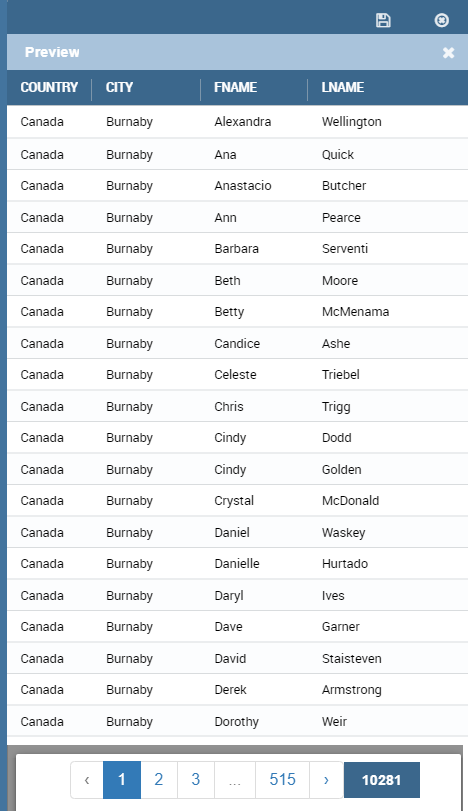
../../_images/image47.png

Fig. 14 Preview and Test of the LOV.

../../_images/image48.png

Fig. 15 Test of the LOV.

Note

Correlating analytical drivers

Drivers can be correlated so that the value of the first driver is used as a parameter to select values in the second. Read more at Analytical document chapter.

We stress that the visibility of specific fields serve to improved human readability when applying filters to documents handled by third users. Moreover it is possible to choose (refer to next figure) between simple, tree and tree with selectable internal nodes typology of LOV. The last two are hierarchical and let the user visualize the parameters together with their logical tree structure.

../../_images/image49.png

Fig. 16 
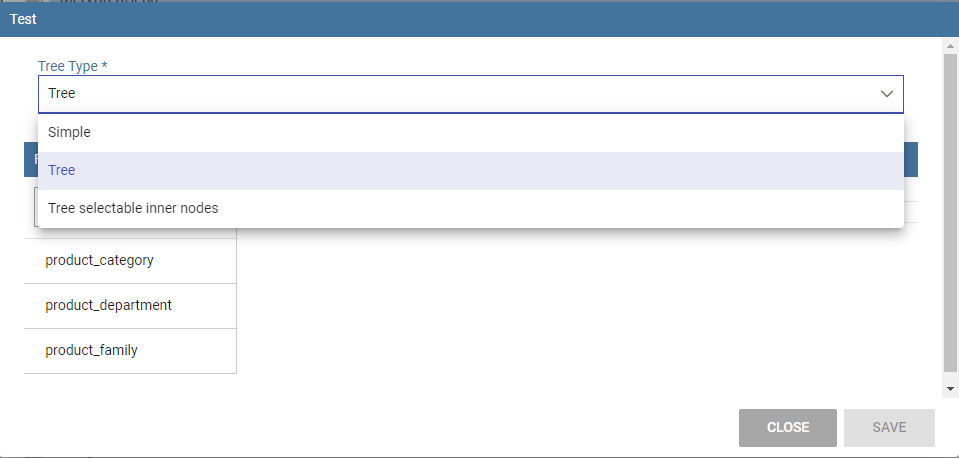
Hierarchical LOV definition.

Note

Create a LOV for the default value of an analytical driver of type Manual Input Date

This note is useful when using an analytical driver of type Date with an input of type Manual. In the case you want to use a particular date as default value for that driver, you have to use this syntax for the LOV: select ‘2017-09-10#yyyy-MM-dd’ as fixed_date. Instead of the fixed date 2017-09-10 you can also use as default date the today date for example; in this case you can use a query of this type: select concat(to_date(now()) ,’#yyyy-MM-dd’) as today. The most important thing is to concat to the default date you want to use the string #yyyy-MM-dd.

Note

Create a LOV for the default value of an analytical driver with a hierarchical LOV

In case you want to add a default value to an analytical driver with an input of type hierarchical LOV you need to use another hierarchical LOV with the default values desired. If the analytical driver LOV is of type Tree then the default LOV need to be of type Tree too. The LOV need to have values for the leaf level only. Otherwise, if the analytical driver LOV is of type Tree selectable inner nodes the default LOV need to be of the same type. The default LOV may have values for one of the level used in the hierarchical LOV. For example, suppose you have an analytical driver with a hierarchical LOV having levels Product Family > Product Category > Product Department. If the hierarchical LOV is of type Tree then in the deafult LOV you need to insert one or more values for the level Product Department. Your default LOV have one level, the Product Department. In case the LOV is of type Tree selectable inner nodes you can choose one of the three levels. Your default LOV have one level between Product Family, Product Category or Product Department.

Parametrizing LOVs

Suppose that you need to retrieve a list of values representing all brand names of your products. Then you can use a Query LOV like in Query LOV example:

Listing 2 Query LOV example
1 SELECT DISTINCT PRODUCT_FAMILY, BRAND_NAME
2 FROM PRODUCT

This is suitable for end users like the general manager who need to see all brands for every product family. Suppose now that another end user is, for example, the food manager. He should not see every brand name, but only those related to the Food product family. This could be done using user’s profile attributes.

In particular, all query except the List of fixed values type can be parameterized using profile attributes. This means that, at LOV execution time, the value of the attribute in the user’s profile is assigned to a placeholder in the LOV query/script. Suppose that, in our example, the food manager user has the profile attribute pr_family equal to Food. You can write this second Query LOV using the placeholder with the standard syntax ${profile_attribute_name}, as shown in Parametric query.

Listing 3 Parametric query
1  SELECT DISTINCT PRODUCT_FAMILY, BRAND_NAME
2  FROM PRODUCT
3  WHERE C.PRODUCT_FAMILY = '${pr_family}'

Then, at LOV execution time, for the user food manager the query becomes as shown in Runtime placeholder substitute and hence the corresponding LOV will return only the brand names related to the Food product family.

Listing 4 Runtime placeholder substitute
1 SELECT DISTINCT PRODUCT_FAMILY, BRAND_NAME
2 FROM PRODUCT
3 WHERE C.PRODUCT_FAMILY = 'Food'

This means that if you are the food manager and your user has the profile attribute pr_family=Food, then you will see only the brand related to the food family as a result of this LOV; while if you are the drink manager and your user has consequently the profile attribute pr_family=Drink, you will see only the brand related to drink family products.

Note

Standard profile attributes

There are some standard profile attributes always available that don’t’ need to be defined for each user. These profile attributes are:

  • user_id contains the user id of the logged in user

  • user_roles contains the current user’s roles, joined as a SQL IN clause fashion, for example: ‘general_management’,’human_resources_management’

  • TENANT_ID contains the tenant to which the user belongs

Note that an information button and a profile attribute button are available to guide user in writing the code properly, using the syntax correctly and typing the right profile attribute name.

../../_images/image50.png

Fig. 17 
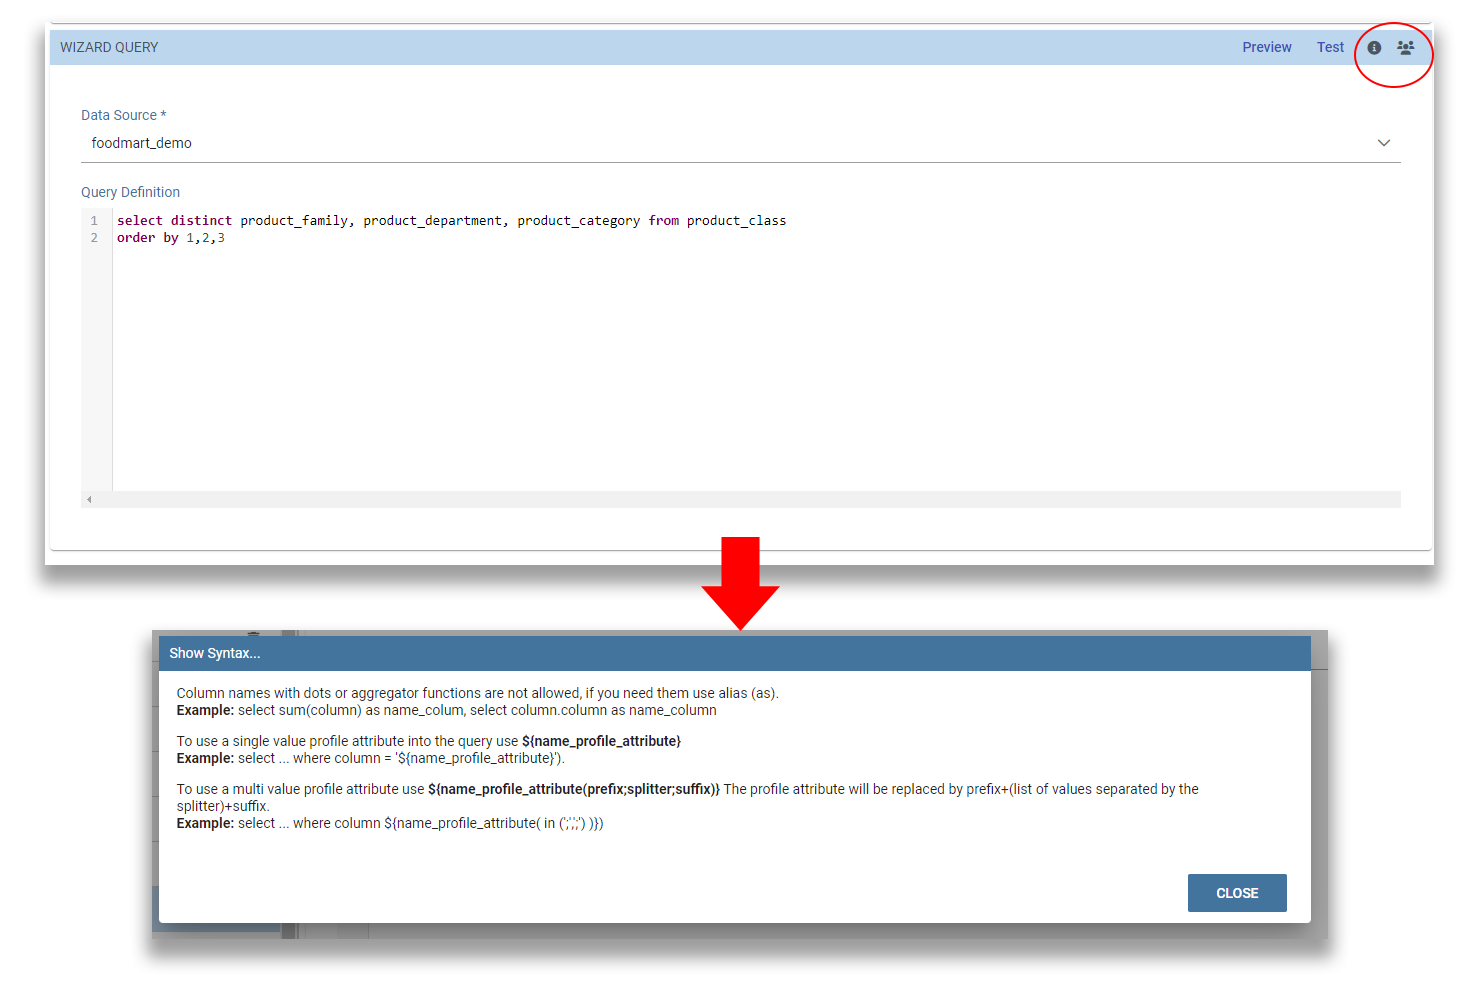
Assistance in retrieving syntax and profile attributes.

Creating a validation rule

Knowage supports the validation of the document’s input parameters via validation rules. Validation rules can be defined in Behavioural model > Constraints Management. A validation rule checks parameter values as given by LOVs to verify that they comply with the defined constraints.

../../_images/image51.png

Fig. 18 Contraints Management.

Knowage default checks are:

  • Alfanumeric: it checks if the parameter is alfanumeric;

  • Numeric: it checks if the parameter is numeric;

  • Letter String: it checks if the parameter is a letter string;

  • E-Mail: it checks if the parameter is an e-mail;

  • Fiscal Code: it checks if the parameter has the correct syntax of a fiscal code;

  • Internet Address: it checks if the parameter is an internet address.

If the administrator needs to create additional validation rules, he can click on image46 to open the rule creation interface. Here he can define a customized validation rule using the available check options:

  • Date: here you can set a customized format type of date;

  • Regular Expression: to set a regular expression validation rule;

  • Max/Min Length: it lets you set the maximum and/or minimum character parameters length;

  • Range: to set a range the parameters value has to satisfy;

  • Decimal: to set a maximal decimal places for the parameters.

Creating an analytical driver

As explained at the beginning of this section, analytical drivers use information about users, their roles and profiles to filter data returned by their associated LOVs. Users, roles and profiles must have been already defined in the project context so that they are available to the driver.

../../_images/image52.png

Fig. 19 Analytical Driver Management.

To create a driver, select Behavioural Model > Analytical Drivers Management from the developer menu. Here, you will see the entire list of available drivers. For each driver, the list shows unique label, description and type. To explore details the user must just select one menu item from the list and they will appear in the half right side, as shown in the figure above. Otherwise to delete one analytical driver the user must use the icon image48 available at the end of each row of the list. Notice that you cannot delete a driver if a document is currently using it.

To create a new driver, click on image49 at the top right corner. The driver creation interface will open. At first execution only the upper part of the window is visible, as shown in the figure below. The upper part is the Detail section, where you can set the label, name and description. Choose the type between Date, String or Number depending on the type of expected data. Select Functional or Temporal if the driver is used by an end user or a scheduler, respectively. A click on the save botton, enabled as soon as the form is filled in, will save the driver and let the section below appear.

../../_images/image53.png

Fig. 20 Driver creation.

In the Analytical Driver Use Mode Details section, one or more LOVs are linked to the current driver, as well as roles and checks are assigned via the so-called use modes.

To associate LOVs to the driver, switch to the “Analytical Driver Use Mode Details” tab. Here the user must set label and name of that specific use mode, the kind of input among LOV input, Manual input and Map input, as shown in below.

../../_images/image541.png

Fig. 21 Detail panel of Analytical Driver creation, second step.

The first type allows the user to pick values from a previously defined LOV. When selecting this option the interface spread out the configuration panel where the user is asked to select a LOV from the list and a Modality. The latter defines how values are displayed and selectable when executing the document. In fact the user can choose among:

  • Select from list: all admissible values will be displayed directly within the drivers panel;

  • Select from popup window: user will be able to select between admissible values by a lookup table displayed within a popup window;

  • Select from tree: conceived for hierarchical LOVs, lets the users navigate the values in a hierarchical way;

  • Select from combobox: the driver will look like a drop down menu.

The second kind of input expects the user to type manually the value. Otherwise the third opens a map from which the user must select one or more regions accordingly to the layer property. When selecting this option the interface spread out the configuration panel where the user is asked to choose a layer and the layer property. More details are supplied in next sections for this kind of input.

Moreover the user can add default values (namely values that will be passed to the document at its first execution) using the dedicated area. Here it is possible to pick default values from another LOV or to pick the first or the latter value of the current LOV (if the LOV input type was selected).

In case of Manual Input Date the user can specify a maximum value driven by a LOV:

../../_images/image571.png

Fig. 22 Detail panel of Analytical Driver creation, specification of a maximum value.

During execution of a document, the date picker will be limited by that value:

../../_images/image58.png

Fig. 23 Detail of a date picker for a date parameter with maximum value specified.

Note

Analytical driver of type Manual Input Date with a default value and/or max value

In the case you want to use an analytical driver of type Manual Input Date with a particular date as default value and/or a maximum value, you have to use a particular syntax for the LOVs query. See the note Create a LOV for the default value of an analytical driver of type Manual Input Date in the section Creating a List Of Value for more details.

Note

Analytical driver with hierarchical LOV and default LOV

In the case you want to use an analytical driver with a hierarchical LOV and a default LOV the latter need to be hierarchical too. For more details see Create a LOV for the default value of an analytical driver with a hierarchical LOV note in the section Creating a List Of Value.

At the bottom of the page the user must associate roles to the “use mode”. This action is mandatory. The user connects the user’s roles that he/she wants to be allowed to see a certain list of values or certain regions or be able to type values at his/her convenience.

Therefore, since an admin user can decide to separate values according to the other users’ roles, the analytical driver definition allows to configure different use mode. We can also set validation checks if needed. Then it is sufficient to save each use mode and click on new use mode to set a new one. We repeat the same procedure for all the use modes. Each use mode is represented in a separate tab. We will go deeper into this at the end of the section.

All the selections can be multi-valued, but note that this option has to be set directly on the document detail during analytical driver association.

Creating an analytical driver for a spatial filter

In previous section we explained how to configure a driver and how it can be linked to different kind of inputs. In this part we linger on the possibility to define a spatial analytical driver. Referring to the following figure, we notice that for setting the geographical driver we must select the map input option: here, expanding the combobox you choose the layer on which the filter will act. It is then necessary that the layer has been previously created and uploaded into Knowage Layers catalog. Then it is mandatory to specify the property name of the geometry in use using the manual text box just below. Remember that the property name must be exactly the same, therefore respect the upper and the lowercase of the string.

../../_images/image55.png

Fig. 24 Spatial analytical driver settings.

These few steps will implent the spatial analytical driver to be associated to a document and be used to set a spatial filter.

Analytical driver’s use modes

Sometimes the same analytical driver (i.e., the same concept, like the concept of product brand) should display different values according to the user that is executing it.

Suppose you have a report on sales and costs like the one in the first figure of this chapter and you want to add to it the possibility to filter also on product brands. If you load the report as the general manager, you should choose between all the possible product brands in the corresponding parameter. If instead you load it as, for instance, the food manager, then you should be able to filter only on product brands related to the Food family.

In order to do this, let us focus again on the definition of the LOV and check that the already defined use mode All Brands is associated to the correct role general_manager. Here you can add a second tab, called for instance Profiled_Brands, and associate it to the role product_manager. This is because the food manager user has product_manager role with profile attribute pr_family = Food.

Finally, we choose the second LOV created, the one returning only those brands that belong to a specific family (see the code example in section Parametrizing LOVs). The family is selected by checking the value of the family attribute in the user profile.

Notice that here you can also choose a different type of display mode for the LOV. In other terms, different use modes correspond not only to different LOVs, but also to (possibly) different display mode (pop-up windows, combobox, …). For instance, you can select a combobox display mode for the All Brands use mode and the pop up window display mode for the Profiled_Brands use mode.

Once you have saved the LOV, just log out from Knowage and log in with a different user role, i.e. as a general manager, food manager and drink manager. Executing your report on sales and costs you can now notice the differences on the values and on the display mode of the Product Brand parameters according to the different users. Notice that, for food manager and drink manager, the parameters are always displayed as a pop-up window, while for the general manager also the display mode of the parameter varies.

../../_images/image56.png

Fig. 25 Behavioural Model Schema.

Behavioural Model Lineage

It is possible to show a summary of the links between the LOVs, the analytical driver and the documents by selecting Behavioural Model > Behavioural Model Lineage.

../../_images/lineage.png

Fig. 26 Behavioural Model Lineage.

The entire list of available LOVs, analytical driver and documents appears, as shown in figure below.

../../_images/lineage2.png

Fig. 27 List of LOVs, analytical driver and documents.

By selecting one LOV or Analytical Driver or Documents the other will refresh showing only the elements associated with the selection done. To come back to the original situation click the refresh button on the top right corner.